Everything the menu can do, and how to make it do it.
Ask the assistant below and it will answer from this guide straight away.
If it cannot help, it will pass you to a person along with what you already typed,
so you never have to explain twice.
Ask the help assistant
It reads the guide on this page and answers in the browser. Nothing is sent
anywhere while you are just asking questions.
It only knows what is written here. When it does not know, it says so
rather than guessing, and offers to email us instead.
iro·menu helpanswers instantly
Getting started
Everything is run from the admin panel at /admin.
Sign in with the email and password you were given. One sign-in can hold more than one
restaurant, so if you run several places you will not be juggling accounts.
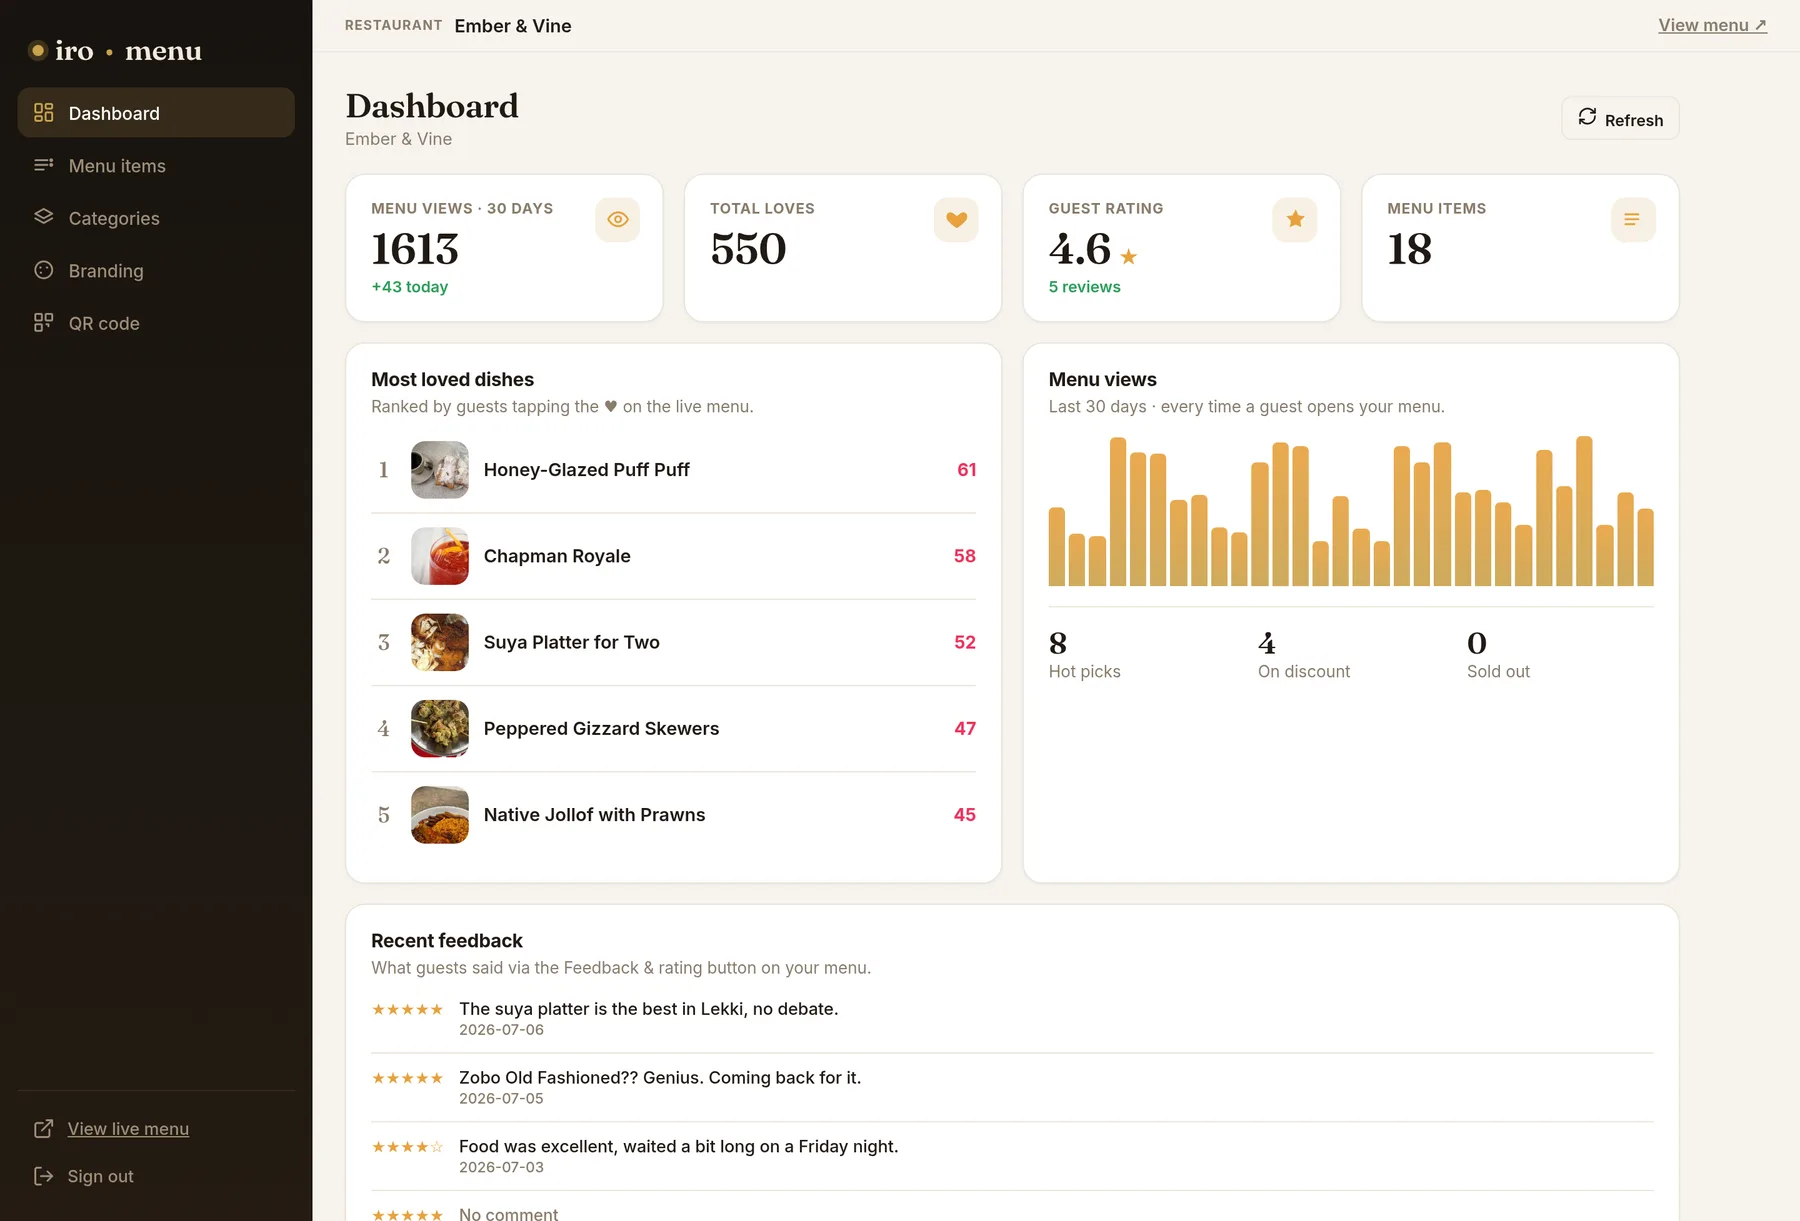
The dashboard you land on. Everything else is one click away in the sidebar on the left.
A restaurant needs a name and a slug, the short word in its web address.
A slug of my-place puts the menu at iromenu.com/m/my-place. Choose it
carefully: it is what the printed QR code encodes, so changing it later means reprinting.
What to fill in first
Under Restaurant you can set the tagline, address, phone, WhatsApp number, Instagram
handle, opening hours, guest wifi name and password, and the currency symbol. The contact
details become tappable chips at the top of the guest's menu: a phone number they can ring
and a wifi password they can read without asking.
You do not need all of it on day one. A name, one category and a few
dishes is a working menu. The rest can be filled in while the code is already on the tables.
Building the menu
A menu is categories with items inside them. Starters, Mains, Sides, Cocktails,
whatever your menu already calls them.
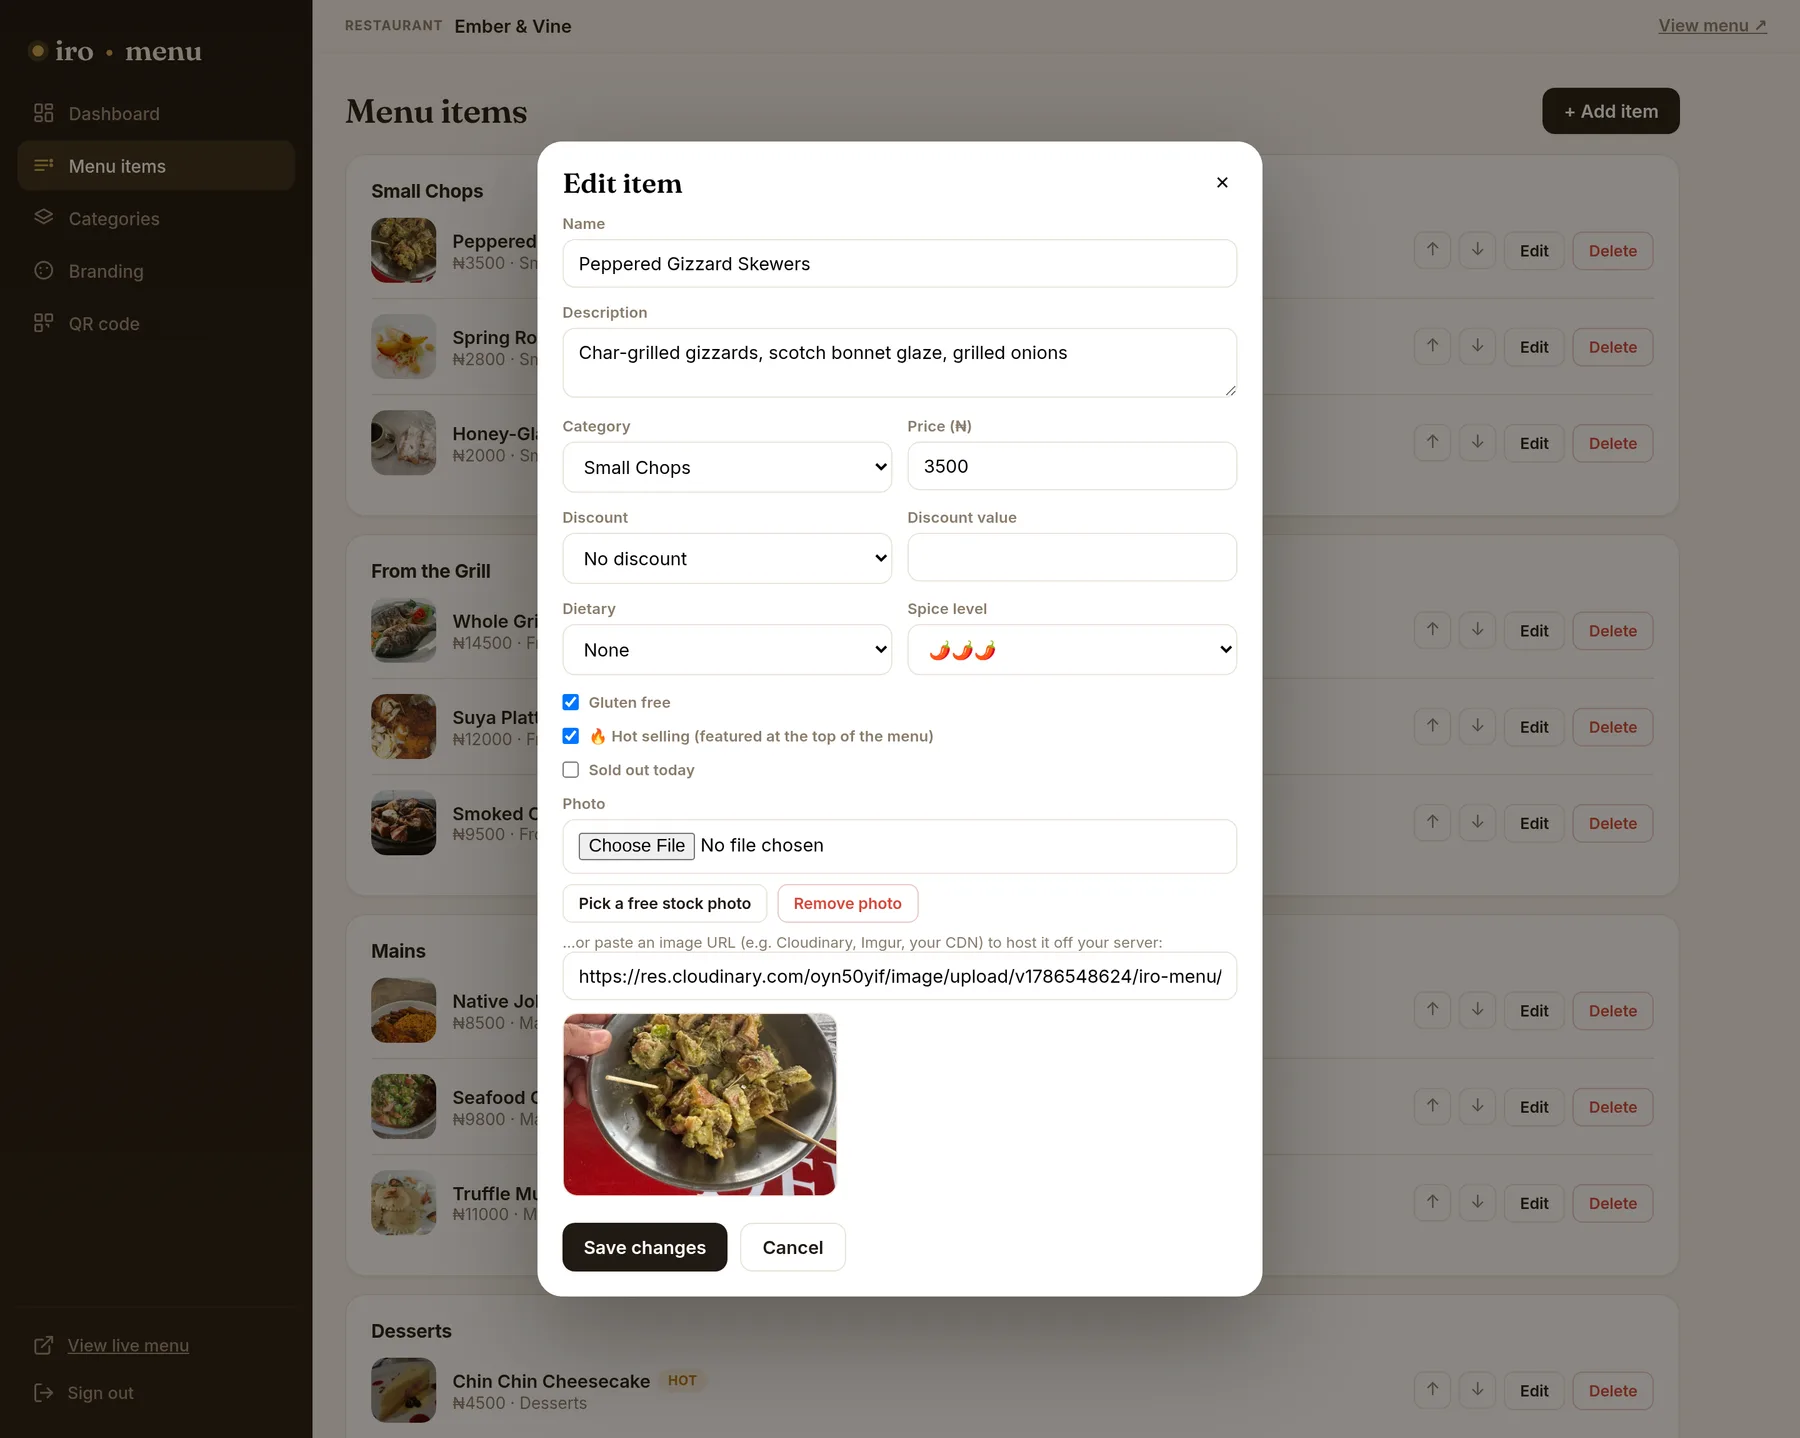
One dish, opened with Edit. Price, discount, the dietary marks, hot and sold out
all live on this one panel.
Food and drinks are two menus
Every category belongs to either the food menu or the drink menu. When you have both, guests
get a FOOD / DRINKS toggle at the top of the page and the two never mix. If you only
use one, the toggle does not appear at all.
Order
Categories and items both carry a sort position, so the running order is yours rather than
alphabetical. Put the thing you want sold first at the top. It is the first thing a guest
sees when they open the section.
Taking something off
An item can be made inactive, which removes it from the guest menu but keeps it in the
admin panel for when it comes back. That is usually what you want for a seasonal dish. Deleting
is for something that is never returning.
A dish that is off for tonight only is a sold out, not an inactive item.
See prices & offers.
Prices & offers
Set the currency symbol once under the restaurant's settings and every price on the menu
uses it. Prices show with thousands separators, and with two decimals only when the number
actually has them, so 1500 reads as 1,500 rather than 1,500.00.
Discounts
An item can carry a discount as either a percentage or a fixed amount off. The menu
then shows the new price, the old one struck through, and a small flag: 20% OFF or
DEAL. Clear the discount and it goes back to the plain price.
Sold out
Switch on Sold out and the dish stays visible but greys out with a SOLD OUT mark. This is
deliberate: guests can see the kitchen has it normally, and they stop asking. It also drops out
of the "Hot right now" rail while it is off.
Hot
Marking an item hot gives it a HOT badge and puts it in the "Hot right now" rail at the
top of the menu. Use it for a handful of dishes; if everything is hot, nothing is.
Photos
A dish can have a photo, either uploaded from your device or pointed at a web address. Uploads
are converted and stored for you. There is a Remove photo button, and clearing the address
field also sticks, so a photo you regret is genuinely gone.
What works
Shoot from above or at a low angle, in daylight, on a plain surface.
One dish per photo. A crowded table looks like someone else's dinner.
Landscape crops best. The menu shows photos in a wide tile.
Photograph what you actually serve, at the portion you serve.
Dishes with no photo
Not every dish needs one, and a half-photographed menu looks worse than an honest one. A dish
without a photo shows a clean tile carrying your logo, so the menu still looks like yours.
Avoid stand-in artwork. A generic plate icon repeated down the menu reads
as a broken page. An unphotographed dish with just its name and description reads as a menu.
Dietary marks & spice
Each item can be marked vegetarian or vegan, gluten free, and given a
spice level of one to three. They appear as small marks beside the dish name: a leaf, a
sprout, GF, or one to three chillies.
They are worth filling in even when it feels obvious. It is the first thing a guest with an
allergy looks for, and it saves a member of staff walking back to the kitchen to ask.
QR codes & tables
Under Your menu QR there is a single code for the whole restaurant: download it, print it,
put it where guests can reach it. It never expires and it does not need reprinting when the menu
changes, because it points at the menu's address rather than its contents.
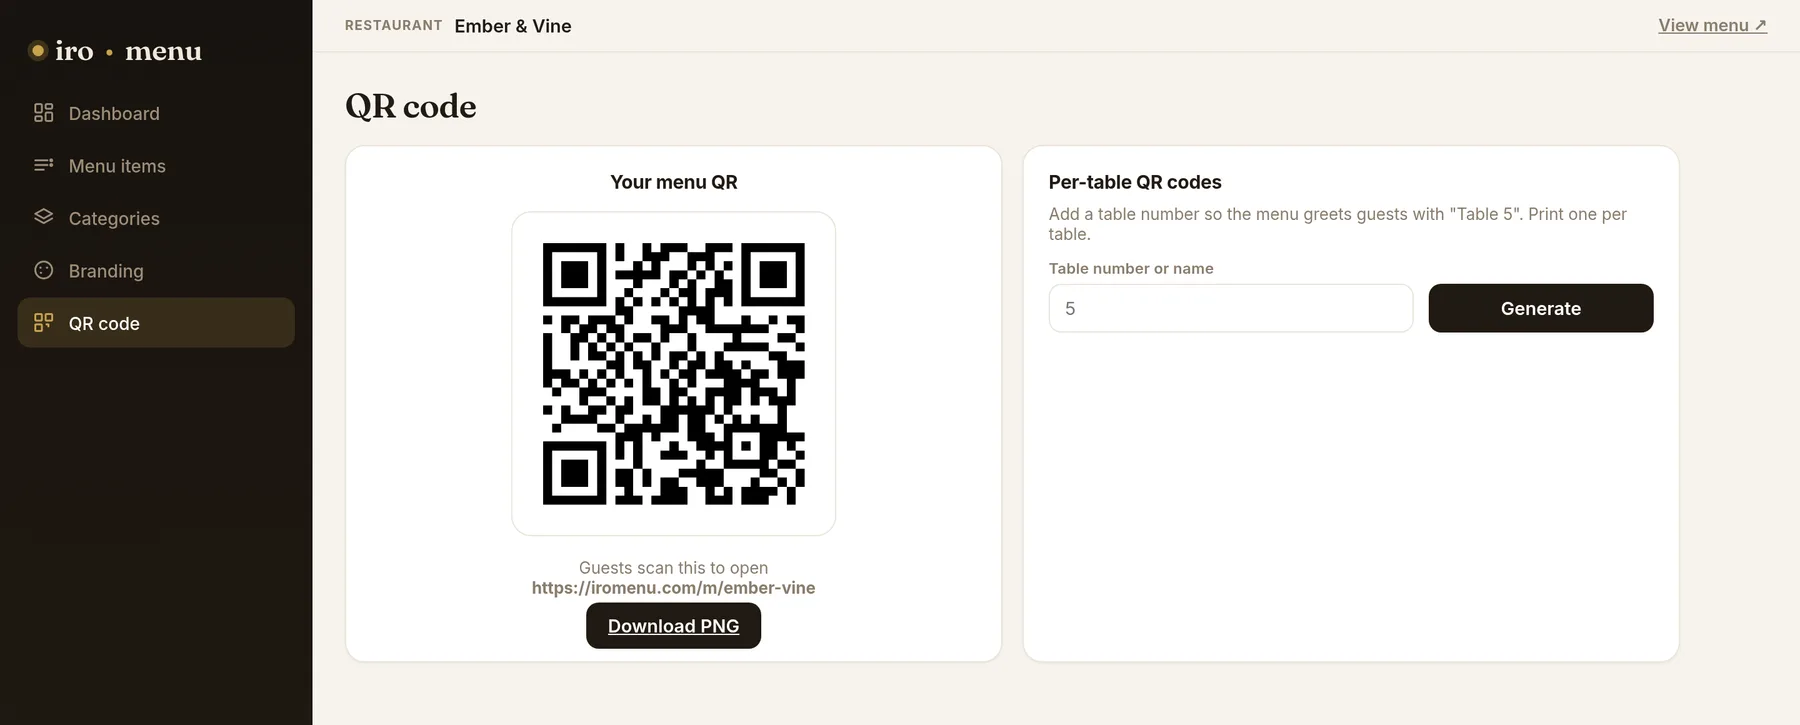
Download it here and print it. The address underneath is what the code encodes, which is
why changing your slug means reprinting.
Per-table codes
You can also generate a code per table. Give the table a number or a name and you get its
own code; a guest scanning it sees the same menu with a small Table 7 badge in the header.
Useful when staff are taking orders from the same screen the guest is reading.
Printing
Print it large enough to scan from a seated position. Around 3 cm across is the floor.
Keep a quiet margin of clear space around the code.
Matte, not gloss. A spotlight on a laminated code makes it unreadable.
Test it with a phone before you print two hundred of them.
Making it yours
The point of the product is that the menu looks like your restaurant and not like software.
Everything here is under Look & feel.
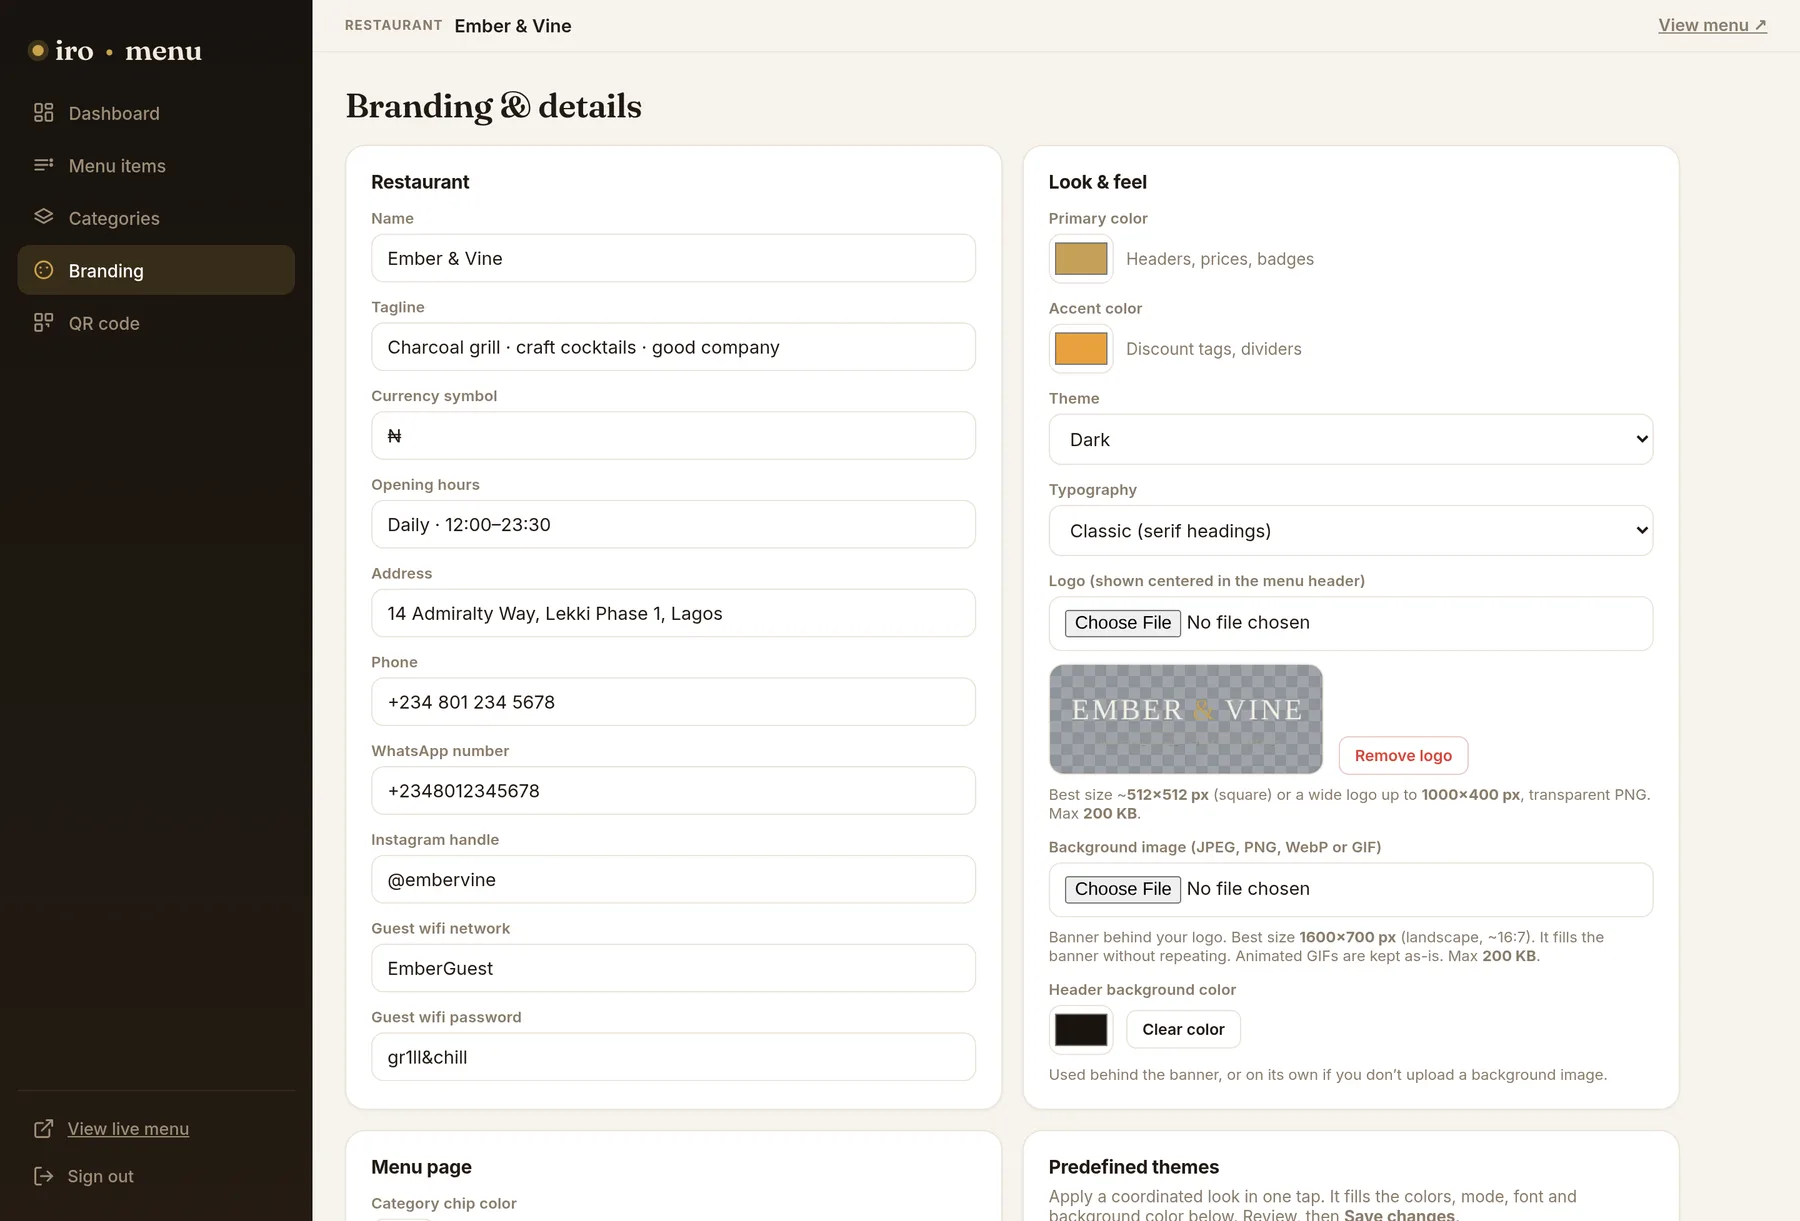
Your details on the left, the look on the right. The colours here are the ones guests see
on prices, chips and badges.
Colours
Set a primary and an accent colour, and optionally a category chip colour. The
primary carries prices, active chips and badges; the accent carries small flags and stars. There
are predefined themes if you would rather start from one and adjust.
Text drawn on your colours picks itself. A near-black brand colour gets light
lettering and a bright yellow gets dark, so a label can never disappear into its own background.
Light or dark
The menu runs in a dark or a light treatment. Dark suits an evening room; light suits a café at
eleven in the morning. It is one setting and it changes the whole page.
Typography
A small set of typography presets (modern, classic and others) changes the lettering across the
menu. Pick the one nearest your printed menu.
Logo and header
Your logo sits centred in the menu header, and doubles as the icon on the browser tab. You can
put a photograph behind it as a header background, or set a flat header colour instead.
Page background
A background image can sit behind the whole menu, with an overlay colour and a dimming
percentage so the lettering stays readable over it. Without an image you can set a flat background
colour, or a two-colour gradient.
Cards and tiles
The item cards have their own colour and transparency, so a background image can show through them
as much or as little as you want. The tiles behind photoless dishes have a transparency setting too.
Layout
The menu opens in a grid or a list, whichever you set as the default. Guests can
switch for themselves with the button in the header. Grid suits a photographed menu; list suits a
long one with descriptions.
The side menu
Side menu shows decides what the drawer lists: every category, only the ones you feature,
or the ones guests love most. The last option reorders itself as guests use the menu.
Importing a menu
If the menu already exists in a spreadsheet, you do not have to retype it. Send it to us and we
will load it for you. Bulk import is run by us rather than from your admin panel, so there is no
import screen to find: ask through the assistant above, or email
[email protected].
What to send
Either a CSV file exported from your spreadsheet, or a Google Sheet link. One row per
dish, with columns for the category, name, description and price, and optional columns for the
discount, hot, vegetarian, spice level, gluten free, sold out and a photo address.
A Google Sheet has to be readable. Set sharing to Anyone with the link
(Viewer) before sending it, otherwise we cannot open it.
Keeping the sheet as the master copy
A sheet we have linked can be set to sync automatically on a schedule. The spreadsheet then
becomes the master copy, and whoever keeps it up to date is keeping the menu up to date. Tell us if
you want that, and how often.
Auto-sync overwrites. If the sheet is the master, edits you make in the admin
panel can be replaced on the next sync. Pick one place to edit and stay there.
What guests can do
Search the whole menu, matching dish names and descriptions.
Jump to a section from the category rail or the side menu.
Open a dish for the full description, the photo and the marks.
Love a dish: a heart on the item, counted and shown as "12 people love this".
Leave feedback: a one-to-five star rating with an optional comment.
Switch grid and list, and switch between the food and drink menus.
Share a dish: a share button on every dish, and one for the whole menu in the side menu.
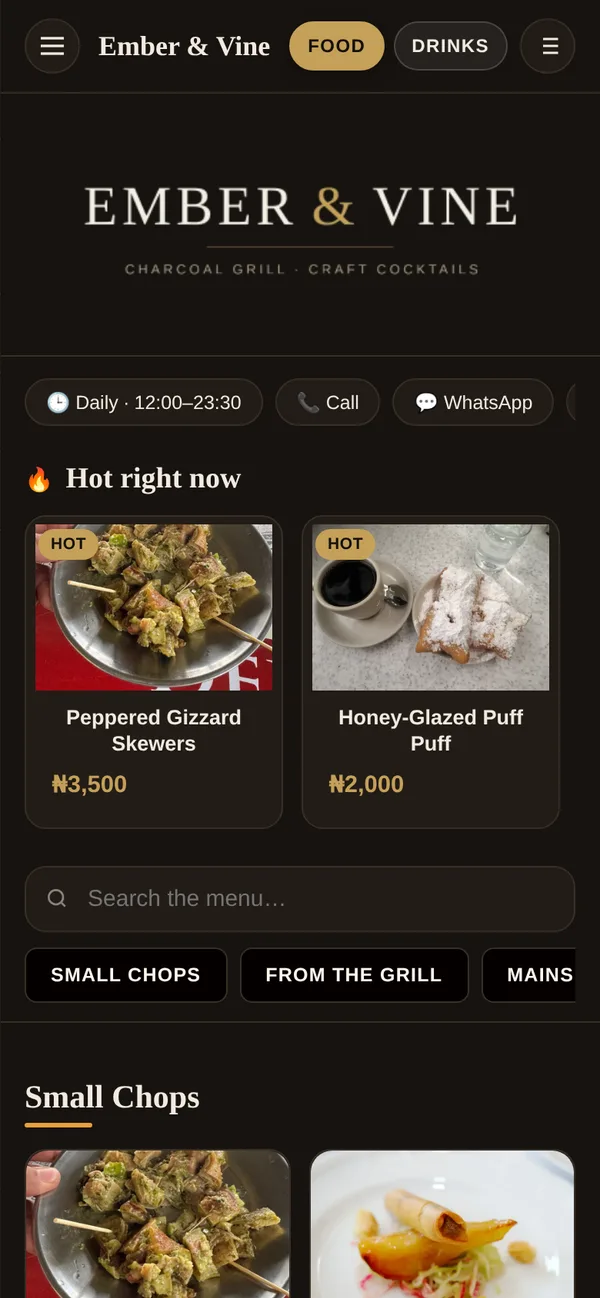
What a guest sees. The food and drink toggle sits in the header, contact chips under it,
and the dishes you marked hot come first.
None of it asks the guest to sign in, install anything, or hand over an email address.
If table service is switched on for you, guests can also build an order and send it to the floor.
That is off unless you have asked for it. See Taking orders at the table.
Sharing a dish
Every dish has a share button. On a phone it opens whatever the guest already shares with:
WhatsApp, Instagram, a message, anything installed. On a computer it offers WhatsApp, Facebook, X,
email and a copy button.
What gets sent is a link straight to that dish. Opening it opens your menu with that dish already
in front of the person, on the right menu, whether it is a plate of suya or a cocktail. In WhatsApp
and on Facebook the link previews with that dish's own photo, its name, its price and your
name, so it arrives looking like the food rather than like a web address.
Nothing is needed from you to make this work, and there is nothing to switch on. Every dish you
have ever put on the menu already has its own address.
Privacy policy
If you add a privacy policy it appears as a link in the menu footer and opens without leaving
the page.
Taking orders at the table
This one is optional, and it is off unless you ask us to switch it on. With it on, a guest can add
dishes to an order on their own phone and send it to you. Nothing is charged through the menu:
an order is a message to the floor saying which table wants what, so a waiter can walk over,
confirm it and take payment the way they always have.
What the guest does
Opens a dish and taps Add to order, choosing how many.
A bar appears at the foot of the menu with the running count and total.
View order opens the basket, where quantities can be changed and a note added.
Submit my order asks which table they are at, then sends it.
If they scanned a code printed for a particular table, the table is filled in for them and they
never have to think about it. See QR codes & tables.
After they send
The order does not disappear from the guest's phone once it is sent. The bar at the foot of the
menu keeps it: Order #4 · ₦25,000, where it has got to, and a Show order button.
One tap brings back the whole thing, every dish and quantity, the total and their own note.
This is for the moment your waiter reaches the table. The guest can read back exactly what they
asked for, and both of you are looking at the same list. It survives locking the phone, closing the
tab and coming back, and it is held on the phone itself, so a guest on bad wifi can still show it.
The status keeps itself up to date while they wait: Received when it lands, Waiter on
the way once somebody has picked it up in the panel, and then it leaves the bar when the order
is marked served. Guests can carry on browsing and send another round whenever they like.
What you do
A new Orders tab appears in the panel. Orders land there the moment they are sent, oldest
first, because the table that has been waiting longest is the one to deal with next. Each one shows
the table, the dishes, the total and any note. Then:
Send a waiter marks it as being dealt with, so nobody walks to the same table twice.
Mark served closes it once the waiter has taken it in person.
Cancel is for an order that will not happen. Cancelled orders stop counting towards
your takings.
The tab carries a count of what is waiting and plays a short chime when something new arrives, so
nobody has to watch the screen. You can silence the chime from the same tab.
Call a waiter
A bell in the menu header lets a guest ask for a waiter, or for the bill, without ordering
anything. Those land at the top of the Orders tab. You can hide the bell if you would rather not
offer it.
Getting it by email as well
Under Service settings on the Orders tab you can give one address that every new order and
waiter call is emailed to. Useful for a phone behind the bar, or for an owner who is not on site.
Orders are saved and shown in the panel whether or not that email ever arrives.
The same panel sets whether a table number is required, and which time zone your days are counted
in, so a service running past midnight still lands on the evening it belongs to.
Prices are ours to decide, not the phone's. What a guest sends is a list of
dishes and quantities. Every price is read from your menu on our side when the order arrives, so a
basket left open while you change a price cannot carry the old one through, and nothing a guest
does on their phone can change what an order comes to.
If a dish sells out while it is sitting in somebody's basket, the order is refused with a note
saying which dish, rather than quietly arriving one dish short.
Your team
A restaurant does not have to be run by one login. From the Team tab you can add other
people to your restaurant and give each of them only the parts of the panel they need.
Menu items: adding, editing and reordering dishes and categories.
Branding & settings: colours, photos, opening hours and the service settings.
Orders: the Orders tab, incoming orders and waiter calls.
Sales figures: the Sales tab, what the day, week and year came to.
Manage team: adding and removing people on this restaurant.
The rights are per restaurant, not per person. The same person can run the menu at one of your
venues and only watch the floor at another, and the panel looks different to them depending on
which one they have open.
The most useful pairing in practice is two roles that do not overlap. A floor manager with
Orders alone works the queue all evening and has no reason to see the month's takings. An
owner with Sales figures alone wants to know how the place is doing from wherever they are,
and has no business marking tables served.
Somebody you add signs in at the same address you do, sees only your restaurant, and can be given
a new password or removed by you at any time. Removing them from your only restaurant deletes their
login with it.
You keep everything. Owning a restaurant carries every right there is.
Adding people never takes anything away from you.
Seeing what sold
The dashboard shows menu views over the last thirty days, your most loved dishes,
and recent feedback with its ratings.
The useful read is not the total. It is which dishes guests keep opening and loving compared with
which ones you actually sell. That gap tells you what to move up the menu, rewrite, or photograph.
Takings
If you take orders through the menu, a Sales tab adds the other half of that picture: what
was actually ordered, and what it came to. Today, the last seven days, thirty days, twelve months
and lifetime sit side by side, with the best sellers for whichever period you pick and a bar per
day of what came in.
Orders still waiting on the floor are counted, because the question is what has been ordered
rather than what has been collected. Cancelled orders are left out of every figure. Days are
counted on your own clock, which you set on the Orders tab.
It is meant to be readable from anywhere. An owner who is not in the building can be given the
Sales tab and nothing else, and watch the evening from their phone.
Sharing the menu
The menu's address, iromenu.com/m/your-slug, can go anywhere: your Instagram bio,
Google Business profile, WhatsApp, a printed flyer.
Shared into WhatsApp, Facebook or X, it previews as a proper card with your restaurant's name and
a picture: one of your dish photos where you have them, your logo on your own colour where you do
not. Search engines see the restaurant's name, description and address rather than a blank page.
Your guests do the same work for you without being asked. Every dish on the menu has a share
button, and the side menu has one for the menu as a whole, so a table that likes something can send
it on. A shared dish previews with that dish's own photo, name and price, and opens the menu on it.
See Sharing a dish.
More than one restaurant
One sign-in can hold several restaurants, each with its own menu, colours, QR codes and numbers.
Switch between them from the admin panel. A group can also have separate admins per venue, so the
manager of one place is not editing another's prices.
Your subscription
iro·menu is sold by the year. Your restaurant has a renewal date, and the whole of that
day is served: the menu is live right through it and only goes off the morning after.
Renew at any point before then and nothing changes for your guests.
Knowing when it is due
The admin panel tells you. From a month out a notice sits at the top of every tab with
the date, and if the date passes it turns red and says so plainly. Nobody has to remember
a number, and there is no invoice buried in an email to go and find.
Renewing early
Paying ahead of the date never costs you days. A renewal is added to the end of the term
you already have, so a year paid a fortnight early is a year and a fortnight.
What happens if it lapses
Your menu goes offline. A guest scanning a QR code on the table lands on the iro·menu
home page rather than an error, so nobody at the table is shown anything about a bill.
Where table service is switched on, orders and waiter calls stop being accepted.
Your admin panel still opens, and everything in it still reads: your menu, your photos,
past orders and every sales figure. What stops is changing anything. Nothing is deleted
and nothing has to be rebuilt, and the menu is back the moment it is renewed, on the same
web address, with the same printed QR codes.
Renewing
Ask us and we will set it. Use the assistant at the top of this page, or email
[email protected].
When something looks wrong
I changed something and the menu still shows the old version
Changes are live the moment you save. What you are almost certainly looking at is the phone's
cached copy. Pull down to refresh, or close the tab and scan again. Check it on a phone that has
not opened the menu before to be sure.
A photo is not showing
If it was pasted as a web address, open that address in a browser tab. If it does not load there,
it will not load on the menu. Some hosts block other sites from using their images. Uploading the
photo instead avoids the problem entirely.
The QR code will not scan
Usually size or shine. Print it larger, keep clear space around it, and use matte rather than
gloss. If one phone struggles and another does not, it is the print, not the code.
A dish is on the menu that should not be
Check whether it is inactive rather than deleted, and whether a linked Google Sheet is
putting it back on each sync.
My menu opens the iro·menu home page instead of my menu
That is what a QR code does once a subscription has run out. Sign in at
/admin; the notice at the top will give you
the date it ended. Renewing brings the menu back on the same address, so the printed codes
do not change. See Your subscription.
I cannot save anything, everything is refused
Check the top of the panel for a red notice. While a subscription is lapsed the panel is
read-only: you can look at everything, but nothing can be changed until it is renewed.
I have forgotten my password
Ask us and we will reset it. Use the assistant above, or email
[email protected].
Something else
Ask the assistant. If it cannot answer, it will pass the conversation to us with your question
attached.